
After passing JNCIS-ENT I needed a break from routing protocols. Weeks of OSPF, BGP, IS-IS, and policy chains. I like networking but I also like doing something different for a while. JNCIA-DevOps looked like the right move: automation focus, still Juniper, and it would give me my third JNCIA cert. I have found out that there is a JNCIA 3x badge and I had been eyeing it for a while. JNCIA-DevOps was the only cert standing between me and it.
WHAT IS PYEZ AND WHY NOT NETMIKO
I wrote about Pexpect, Paramiko, and Netmiko before. All three work over SSH and talk to the CLI. You send a command, get back text, parse that text, and hope the output format never changes between software versions. Fragile by design.
PyEZ talks NETCONF over SSH instead of CLI. So instead of screen scraping show ospf neighbor, you call an RPC and get back structured XML. The device sends you actual data with field names, not formatted text you have to parse yourself. NETCONF was designed for exactly this, which is why PyEZ sits on top of it.
from jnpr.junos import Devicewith Device(host="srx1") as dev: ospf = dev.rpc.get_ospf_neighbor_information() for n in ospf.findall(".//ospf-neighbor"): print(n.findtext("neighbor-address"), n.findtext("ospf-neighbor-state"))LAB TOPOLOGY
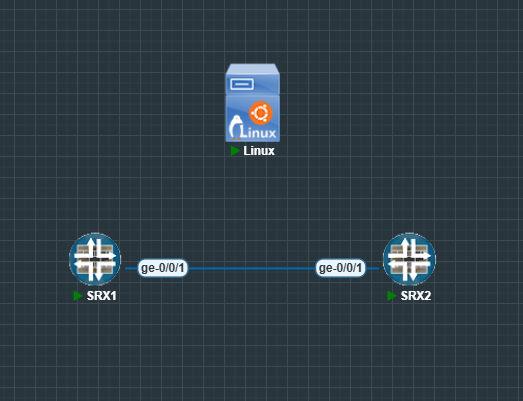
- R1 (vSRX):
192.168.100.101 - R2 (vSRX):
192.168.100.102 - Ubuntu automation VM:
192.168.100.121 - Data-plane link:
R1 ge-0/0/1.0 = 10.0.12.1/30,R2 ge-0/0/1.0 = 10.0.12.2/30
SRX PREP
PyEZ needs NETCONF enabled on the device. On SRX, NETCONF runs over SSH but it is not on by default, and management traffic must be explicitly allowed on the interface. Apply this on each router:
set system host-name R1set system login user admin class super-userset system login user admin authentication plain-text-passwordset system services sshset system services netconf sshset interfaces ge-0/0/0 unit 0 family inet address 192.168.100.101/24set interfaces ge-0/0/1 unit 0 family inet address 10.0.12.1/30set interfaces lo0 unit 0 family inet address 10.0.0.1/32set protocols ospf area 0.0.0.0 interface ge-0/0/1.0set protocols ospf area 0.0.0.0 interface lo0.0 passiveset routing-options router-id 10.0.0.1set security zones security-zone mgmt interfaces ge-0/0/0.0set security zones security-zone mgmt interfaces ge-0/0/0.0 host-inbound-traffic system-services pingset security zones security-zone mgmt interfaces ge-0/0/0.0 host-inbound-traffic system-services sshset security zones security-zone mgmt interfaces ge-0/0/0.0 host-inbound-traffic system-services netconfset security zones security-zone trust interfaces ge-0/0/1.0set security zones security-zone trust interfaces ge-0/0/1.0 host-inbound-traffic protocols ospfcommitUBUNTU SETUP AND SSH ALIASES
Install the library and set up SSH keys. Keeping credentials out of scripts is worth the few extra minutes upfront.
sudo apt update && sudo apt install -y python3 python3-pippip3 install junos-eznc pyyaml jinja2ssh-keygen -t ed25519 -f ~/.ssh/id_ed25519 -C "junos-lab"PUB_LINE="$(cat ~/.ssh/id_ed25519.pub)"ssh admin@192.168.100.101 "configure; set system login user admin authentication ssh-ed25519 \"$PUB_LINE\"; commit and-quit"ssh admin@192.168.100.102 "configure; set system login user admin authentication ssh-ed25519 \"$PUB_LINE\"; commit and-quit"Then create ~/.ssh/config with short aliases:
Host srx1 HostName 192.168.100.101 User admin IdentityFile ~/.ssh/id_ed25519 IdentitiesOnly yesHost srx2 HostName 192.168.100.102 User admin IdentityFile ~/.ssh/id_ed25519 IdentitiesOnly yesNow Device(host="srx1") just works without credentials in the script. Test with ssh srx1 "show system uptime | no-more" before touching any Python.
CONNECTING AND READING DATA
First script: connect, read device facts, pull OSPF neighbors.
from jnpr.junos import Devicewith Device(host="srx1") as dev: print("Hostname:", dev.facts["hostname"]) print("Model:", dev.facts["model"]) print("Version:", dev.facts["version"]) ospf = dev.rpc.get_ospf_neighbor_information() for n in ospf.findall(".//ospf-neighbor"): print(n.findtext("neighbor-address"), n.findtext("ospf-neighbor-state"))dev.facts is populated automatically on connect. The OSPF RPC name maps directly to the CLI command: show ospf neighbor information becomes get_ospf_neighbor_information(). Juniper documents the RPC names in their reference, and you can also find them by running show ospf neighbor | display xml rpc on the device itself, which prints the exact RPC call being made underneath.
THE CONFIG WORKFLOW
PyEZ follows a lock/load/diff/commit/unlock pattern. The diff step is where most of the value is: you see what is about to change before it changes, which is not something you get from Netmiko.
from jnpr.junos import Devicefrom jnpr.junos.utils.config import Configwith Device(host="srx1") as dev: cu = Config(dev) cu.lock() cu.load("set routing-options static route 172.16.99.0/24 next-hop 10.0.12.2", format="set") print(cu.diff()) cu.commit() cu.unlock()A script that pushes config without reviewing the diff will eventually commit something you did not intend. I have done this with templated automation where a variable rendered wrong and I didn't catch it because the diff was skipped. Worth building the habit early.
You can also validate without committing, which is useful when you want to test a change but not apply it yet:
cu.load("set system host-name R1", format="set")print(cu.commit_check()) # validate onlycu.rollback(0) # discard the candidate changecu.unlock()And roll back a commit when something goes wrong:
cu.lock()cu.rollback(1)print(cu.diff())cu.commit()cu.unlock()rollback(1) goes back one commit. rollback(0) just discards the current candidate config without touching what is already committed.
SCALING WITH YAML AND JINJA2
Once the single-device workflow is working, extending it to multiple devices is mostly just adding a loop. Define inventory in YAML, render per-device config from a Jinja2 template, connect and push.
inventory.yml:
devices: - name: R1 host: srx1 - name: R2 host: srx2standard_config.j2:
set system login message "Managed by PyEZ lab"set interfaces ge-0/0/0 description "{{ name }}-MGMT"set interfaces ge-0/0/1 description "{{ name }}-P2P"deploy_template.py:
import yamlfrom jinja2 import Templatefrom jnpr.junos import Devicefrom jnpr.junos.utils.config import Configinventory = yaml.safe_load(open("inventory.yml"))template = Template(open("standard_config.j2").read())for d in inventory["devices"]: with Device(host=d["host"]) as dev: cu = Config(dev) cu.lock() cu.load(template.render(name=d["name"]), format="set") print(d["name"], "diff:") print(cu.diff()) cu.commit() cu.unlock()CONCLUSION
Coming from Paramiko and Pexpect, PyEZ feels noticeably less held together with tape. The NETCONF layer handles the transport, you get structured data back, and you do not have to pray that the output format matches what your regex expects. The JNCIA-DevOps exam covers PyEZ alongside Ansible and REST API basics. This lab covered enough of the PyEZ side to feel reasonably prepared. Whether that was accurate is a question for after the exam.